Tech Life (II): Time Lapse Photography (OJG)
It seems that we have rekindled people's photographic creativity with our time lapse photography videos.
So, after a couple of requests here is a short guide. It is still fairly basic, as I am still very much in the learning phase myself.
 Personally, I think the most important thing about time lapse photography is having the right equipment. Critically, to have a camera which has an intervalometer. Luckily for me, I got one such camera at Christmas. I honestly do not know how many cameras out there have it built in, BUT, I have also seen on the web various camera remotes that will do the same job. Some are cabled and some work on Infrared. A lot of cameras both small and large are covered.
You will also need something to secure the camera into a position. Usually this is a tripod, any one will do. For the travel time lapse inside Henry I just rested the camera on various objects until I thought the camera was level. It ended up moving after a few hours, but I will sort that out in a session or two.
Once you have the basic equipment, it is easy to get started...
 Well mostly easy. Having a plan and thinking out your time lapse session is an absolute necessity. Each time I do it, new little things appear for the checklist. Intro in? How to change the scene? What parts of the scene are going to be interesting? Continuity with the clouds? etc. Once you start recording, it is impossible to go back and add bits.
That's it.
If you get past the immediate time lapse trend and want to do greater and bigger stuff (as I am trying), then you will need to consider the following:
- Memory Storage: time lapse uses up a ton of images. Obviously you can vary this a bit, but for a film of a couple of minutes you are generally talking about 1000 images. You can reduce the photographic image size as video has a much lower resolution than still photos. But still, if you want a video to last 5 or more minutes, you will have to buy a large memory card. Also try and make it fast!
- Battery Life: My previous camera could take over 2000 shots before I had to change the battery. My current one struggles to reach 900. This is a huge problem. Fortunately my camera can take a direct power cable from the mains (or a converter hooked to the 12v in a vehicle). If your camera cannot take an external power supply, then I suggest practicing the battery change over and getting it as quick as possible! Buy plenty of spares.
- Fixing: If your time lapse is going to span longer than a few days then I suggest you find a way to fix the camera mounting solidly to it's base. In terms of a tripod, weigh it to the ground and make sure you have rain cover. Inside a vehicle, bolt the mount to the dash or wherever it is going to go. Most modern tripods have a shoe which can easily come out. Use the shoe to get the camera out of the mount.
- Settings: Make sure you record the camera settings, and check before each session that they are correct. This is especially true for focusing, which I leave on manual just to be safe.
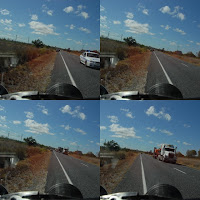 I shot both of the driving videos at 1 frame every 10 seconds. I do intend to try all sorts of faster time lapses in the future, but 10 seconds is my limit with my current battery situation.
- I then uploaded the images to the computer, batch reduced the size (Picasa will do this, as well as apply Feel Lucky) down to 640 by 480. Don't use large images in the video program or it will slow to a crawl.
- I then used Adobe Premier Elements 3 (most video creating programs will work fine) to import all the still images.
- Next, I changed the settings in Premier to make still shots last 3 video frames each (about 1/8th of a second). I then dragged all the images to the video time-line, and voila, the video is now ready.
- I then added a few transitions, a few titles, and a soundtrack. All modern day video programs do these things easily.
- Exported the whole lot as an MPEG designed for "Cable/DSL" downloads.
- Upload the video to Youtube.

If you decide to shoot the frames faster than 1 every 10 seconds, you can reduce the amount of time each of these frames will need in the video. I reckon that shots done every second or less can easily be played back at 1 frame per shot.
 Next steps for me? I am waiting for a power cable to give unlimited battery life, and then I might make a small jig which I will fix to the dashboard for absolute continuity. Also a wider angle lens might give some interesting results! Apart from that, it is all a big fun experiment, I hope you enjoy it as much as we do!
Oly
PS, if any of you do try this, please let us know and we will add the links to our blog.


1 comment:
have given the time-lapse thing our first try...
the quality of the foorage is a bit dodgy [totally blaming the camera for that], but it's a fun thing to play with
Post a Comment